Rockhopper VPN
IPsec/IKEv2-based VPN software for Linux
- Installation
- Rockhopper Web console
- Installation on the non-GUI environment.
- Uninstalling this software.
- Let's deploy a simple VPN.
- Watch demo movies of installation and configuration.
Installation
Currently tested Linux distributions and Web browsers:
-
Ubuntu Desktop/Server 12.04 or later
-
CentOS 6.0 or later
-
Linux Mint 17.0 or later
-
Debian 7.1 or later
-
Fedora 21 or later
-
Firefox 3.6 or later
-
Google Chrome 13.0.x or later
Currently, Internet Explorer's Javascript API is NOT supported. Sorry.
Required additional libraries and tools:
- Building tools(gcc, make, etc.)
- libcap2 / libcap2-bin
- libssl-dev(OpenSSL)
- libxml2-dev(Gnome libxml2)
- libsqlite3-dev(SQLite)
- libxml-libxml-perl
- perl-libwww-perl
- libswitch-perl
- libjson-perl [Optional]
- libgtk2-perl [Optional]
- bridge-utils [Optional]
- iptables / ip6tables [Optional]
Before running the installer script, please update package information (e.g. sudo apt-get update or yum update).
If you configure a Split DNS for your VPN (IPv6), it requires kernel v3.7 and later (supporting IPv6 NAT) and corresponding ip6tables (e.g. Ubuntu 13.04 or later).
Install Rockhopper VPN software:
- Please download this software's package(rockhopper-<version>.tgz).
- tar zxvf rockhopper-<version>.tgz
- cd rockhopper-<version>
-
sudo ./install.sh *:Please
run the installer script as root.
If you want to test, develop or hack Rockhopper VPN software, it is also useful to install additional debug trace tools. Please read "Documents/Debug Trace" to get more detailed information before the installation.
Please install like this:
4. sudo ./install_dbg.sh
Incidentally, if you want to build Rockhopper with no optimization (gcc -O0), please install like this:
4. sudo ./debug_tools/install_dbg_no_optmz.sh
To enable most debug flags (see rhp_misc.h), run the installer like this:
4. sudo ./debug_tools/install_dbg_all.sh
Uninstall Rockhopper VPN software:
- cd rockhopper-<version>
-
sudo ./uninstall.sh *:Please
run the installer script as root.
Rockhopper VPN Management by Web console
Now you can open Rockhopper Web console by Web browser like firefox.The default URL of the top page is http://127.0.0.1:32501/ (or http://localhost:32501/).
Also, you can start it by launcher in the Start Menu or in the Unity dashboard (Ubuntu).
Default administrator's information:
Name: admin
Password: secret
[CAUTION]
Please change the password immediately. You can do this on Web console's Management tab pane.
(Ubuntu - Unity dashboard)


Installation on the non-GUI environment:
By default, Rockhopper's Web management service is open on the loopback address (http://127.0.0.1:32501/). When you install this software on a distribution without GUI like Ubuntu Server, it is useful to configure an additional address and port remotely accessible from other PCs. You can setup this by rockhopper.pl (or rockhopper) management tool.|
(- 0.2.b1-018-x) # rockhopper.pl web-mng -mng_address <machine's IPv4> -admin admin -password <password> or (0.2.b1-019 -) # rockhopper web-mng -mng_address <machine's IPv4> -admin admin -password <password> # sudo /etc/init.d/rockhopper restart or # sudo systemctl restart rockhopper |
(Example)
# ip addr s dev eth0
2: eth0:
group default qlen 1000
link/ether 00:xx:xx:xx:xx:xx brd ff:ff:ff:ff:ff:ff
inet 192.168.20.100/24 brd 192.168.20.255 scope global eth0
valid_lft forever preferred_lft forever
inet6 fe80::xxxx:xxxx:xxxx:xxxx/64 scope link
valid_lft forever preferred_lft forever
(- 0.2.b1-018-x)
# rockhopper.pl web-mng -mng_address 192.168.20.100 -admin admin -password secret
or
(0.2.b1-019 - )
# rockhopper web-mng -mng_address 192.168.20.100
Admin Name: admin
Password: secret
# sudo /etc/init.d/rockhopper restart
or
# sudo systemctl restart rockhopper
Now you can access http://192.168.20.100:32501/ remotely by Web browser.
[CAUTION]
Communication between Rockhopper's Web management service and Web browsers is NOT encrypted, so you should access the management service on protected network/LAN.
Let's deploy a simple VPN.
Simple VPN example(1): Router(Routing-based VPN) and Pre-Shared Key.The following image shows example network for this scenario.
Ubuntu is installed on VPN Gateway(Router), VPN remote host and Internal host.
Rockhopper VPN software is installed on VPN remote host and VPN Gateway(Router). VPN is connected between these two nodes. Pre-Shared Key(PSK) is used as an authentication method.
Please also watch demo movies of this example's configuration.

rhpvif10: A virtual interface(a Tunnel/TAP interface) to access internal network. "10" is the VPN realm ID. This interface is automatically created by Rockhopper VPN service.
eth0 and eth1: Real interfaces to access physical network.
A VPN realm is a security domain for group members to share the same security policy and VPN configuration. For instance, you can define the VPN realm "10" for a sales team and the other VPN realm "20" for a developing team.
Advance preparation:
VPN Gateway(gateway1.example.com):
|
# sudo ifconfig eth0 10.0.0.1 netmask 255.255.255.0
# sudo ifconfig eth1 192.168.1.1 netmask 255.255.255.0 # sudo sysctl net.ipv4.ip_forward=1 |
VPN remote host(remotehost1.example.com):
| # sudo ifconfig eth0 10.0.0.10 netmask 255.255.255.0 |
Internal host:
|
# sudo ifconfig eth0 192.168.1.20 netmask 255.255.255.0
# sudo route add default gw 192.168.1.1 |
Configuring VPN:
VPN Gateway(gateway1.example.com):
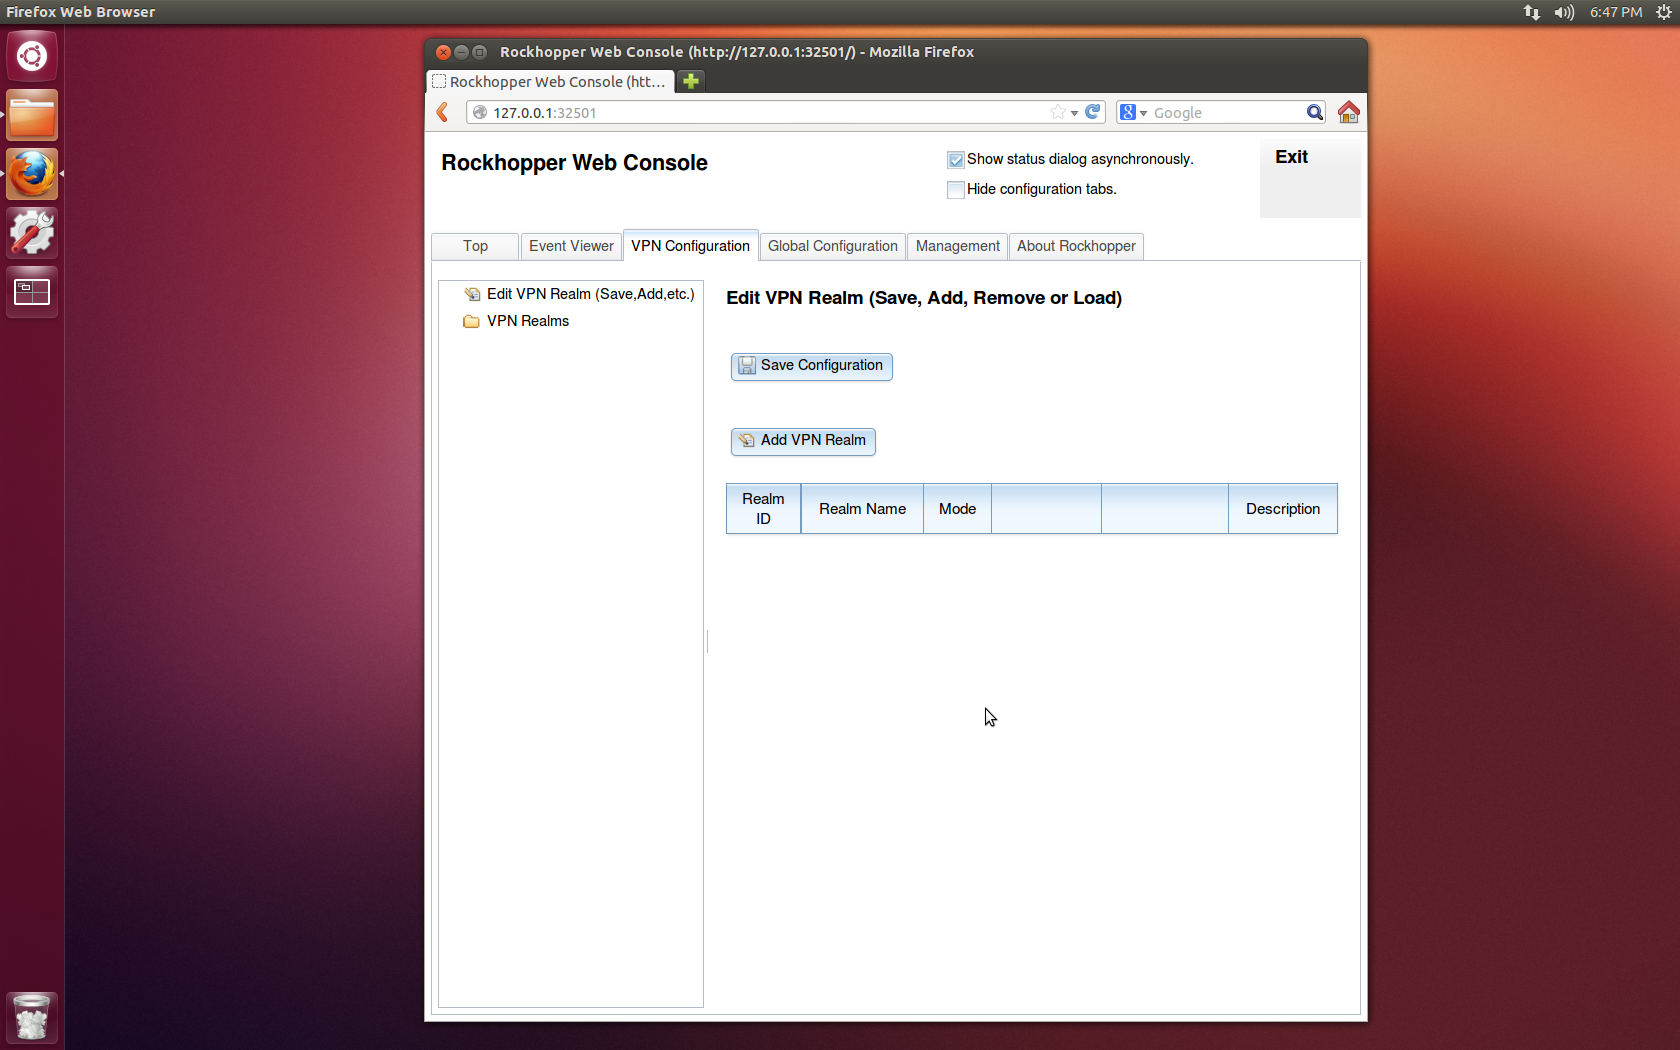
- Open Rockhopper Web console on http://127.0.0.1:32501 (by default) by Firefox.
- Login with administrator's name and password (by default, admin and secret).
- If VPN Configuration tab is not shown, uncheck Hide configuration tabs checkbox.
-
Add a new VPN realm.
- VPN Configuration[Tab] > Edit VPN Realm(Save, Add, etc.)[Left-Tree]: Click this tree node and show Edit VPN Realm(Save, Add, Remove, or Load) pane.
- Click Add VPN Realm button.
- Add a VPN Realm[Dialog]: Enter the following, then click OK button.
Realm ID: 10
Realm Name: "Example VPN"
Description: "Config for Example VPN."
Mode: Router -
Setup VPN Interface.
- VPN Configuration[Tab] > VPN Realms[Left-Tree] > 10:Example VPN(Router)[Left-Tree] > VPN Interface[Left-Tree]:
Click this tree node and show VPN Tunnel/TAP Interface pane.- Enter the following.
Internal Address Type: Static Address
Internal IPv4 Address: 192.168.0.1
Netmask: 255.255.255.0 -
Setup Network Interface.
- VPN Configuration[Tab] > VPN Realms[Left-Tree] > 10:Example VPN(Router)[Left-Tree] > Network Interface[Left-Tree]:
Click this tree node and show Network Interface pane.- Uncheck Use default route and enter the followings.
Primary interface:
- Name: Select eth0 as a source interface.
-
Setup Service.
- VPN Configuration[Tab] > VPN Realms[Left-Tree] > 10:Example VPN(Router)[Left-Tree] > Service[Left-Tree]:
Click this tree node and show Service pane.- Network Deployment: Select Hub(Concentrator) Node.
- Remote Configuration(IKEv2): Select Disabled.
-
Setup My Key Store.
- VPN Configuration[Tab] > VPN Realms[Left-Tree] > 10:Example VPN(Router)[Left-Tree] > My Key Store[Left-Tree]:
Click this tree node and show My Key Store pane.- Enter the following.
Authentication Method: Pre-Shared Key(PSK)
My ID Type: Host Name(FQDN)
My ID: gateway1.example.com
Pre-Shared Key(PSK): abcdefghij -
Setup Peers' Key Store.
- VPN Configuration[Tab] > VPN Realms[Left-Tree] > 10:Example VPN(Router)[Left-Tree] > Peers' Key Store[Left-Tree]:
Click this tree node and show Peers Key Store pane.- Click Add Peer's Pre-Shared Key(PSK) button.
- Add a New Peer's Pre-Shared Key(PSK)[Dialog]:
Enter the following, then click OK button.Peer ID Type: IKEv2-PSK: Host Name(FQDN)
Peer ID: remotehost1.example.com
Pre-Shared Key(PSK): 1234567890 -
Save this realm's configuration.
- VPN Configuration[Tab] > Edit VPN Realm(Save, Add, etc.)[Left-Tree]:
Click this tree node and show Edit VPN Realm(Save, Add, Remove, or Load) pane.- Click Save Configuration button.
VPN remote host(remotehost1.example.com):
- Open Rockhopper Web console on http://127.0.0.1:32501 (by default) by Firefox.
- Login with administrator's name and password (by default, admin and secret).
- If VPN Configuration tab is not shown, uncheck Hide configuration tabs checkbox.
-
Add a new VPN realm.
- VPN Configuration[Tab] > Edit VPN Realm(Save, Add, etc.)[Left-Tree]:
Click this tree node and show Edit VPN Realm(Save, Add, Remove, or Load) pane.- Click Add VPN Realm button.
- Add a VPN Realm[Dialog]: Enter the following, then click OK button.
Realm ID: 10
Realm Name: "Example VPN"
Description: Config for Example VPN."
Mode: End Node -
Setup VPN Interface.
- VPN Configuration[Tab] > VPN Realms[Left-Tree] > 10:Example VPN(End Node)[Left-Tree]
> VPN Interface[Left-Tree]:
Click this tree node and show VPN Tunnel/TAP Interface pane.- Enter the following.
Internal Address Type: Static Address
Internal IPv4 Address: 192.168.0.10
Netmask: 255.255.255.0 -
Setup Network Interface.
- VPN Configuration[Tab] > VPN Realms[Left-Tree] > 10:Example VPN(End Node)[Left-Tree]
> Network Interface[Left-Tree]:
Click this tree node and show Network Interface pane.- Check Use default route.
or
- Uncheck Use default route and enter the followings.
Primary interface:
- Name: Select eth0 as a source interface.
-
Setup Service.
- VPN Configuration[Tab] > VPN Realms[Left-Tree] > 10:Example VPN(End Node)[Left-Tree]
> Service[Left-Tree]:
Click this tree node and show Service pane.- Network Deployment: Select Spoke Node/Other.
- Remote Configuration(IKEv2): Select Disabled.
-
Setup My Key Store.
- VPN Configuration[Tab] > VPN Realms[Left-Tree] > 10:Example VPN(End Node)[Left-Tree]
> My Key Store[Left-Tree]:
Click this tree node and show My Key Store pane.- Enter the following.
Authentication Method: Pre-Shared Key(PSK)
My ID Type: Host Name(FQDN)
My ID: remotehost1.example.com
Pre-Shared Key(PSK): 1234567890 -
Setup Peers.
- VPN Configuration[Tab] > VPN Realms[Left-Tree] > 10:Example VPN(End Node)[Left-Tree]
> Peers[Left-Tree]:
Click this tree node and show Peers pane.- Click Add Peer button.
- Add a New Peer[Dialog]: Enter the following, then click OK button.
Peer ID Type: Host Name(FQDN)
Peer ID: gateway1.example.com -
Setup the Peer's information.
- VPN Configuration[Tab] > VPN Realms[Left-Tree] > 10:Example VPN(End Node)[Left-Tree]
> Peers[Left-Tree] > gateway1.example.com(FQDN)[Left-Tree]:
Click this tree node and show Peer: gateway1.example.com(FQDN) pane.- Enter the following.
Peer's IPv4 Address: 10.0.0.1
This peer's Network Deployment: Hub(Concentrator) Node -
Setup Peers' Key Store.
- VPN Configuration[Tab] > VPN Realms[Left-Tree] > 10:Example VPN(End Node)[Left-Tree]
> Peers' Key Store[Left-Tree]:
Click this tree node and show Peers Key Store pane.- Click Add Peer's Pre-Shared Key(PSK) button.
- Add a New Peer's Pre-Shared Key(PSK)[Dialog]: Enter the following, then click OK button.
Peer ID Type: IKEv2: Host Name(FQDN)
Peer ID: gateway1.example.com
Pre-Shared Key(PSK): abcdefghij -
Setup Internal Route Map.
- VPN Configuration[Tab] > VPN Realms[Left-Tree] > 10:Example VPN(End Node)[Left-Tree]
> Internal Route Map[Left-Tree]:
Click this tree node and show Internal Route Map pane.- Click Add Route button.
- Add a New Internal Route[Dialog]: Enter the following, then click OK button.
Destination IPv4 Network: 192.168.1.0
Netmask: 255.255.255.0
Forwarding Type: Gateway IPv4 Address
Forward To: 192.168.0.1 -
Save this realm's configuration.
- VPN Configuration[Tab] > Edit VPN Realm(Save, Add, etc.)[Left-Tree]:
Click this tree node and show Edit VPN Realm(Save, Add, Remove, or Load) pane.- Click Save Configuration button.
Connecting VPN (remotehost1.example.com):
- Open VPN remote host's Web console on http://127.0.0.1:32501 (by default) by Firefox.
- Login with administrator's name and password (by default, admin and secret).
-
Top [Tab] > 10:Example VPN[Left-Tree] >
gateway1.example.com(FQDN)[Left-Tree]:
Click this tree node and show 10: gateway1.example.com(FQDN) pane. - Click Connect button.