Rockhopper VPN
IPsec/IKEv2-based VPN software for Linux
Use chained X.509 certificates (Hash and URL).
Before reading this page, please read and understand "Hash and URL for a X.509 certificate." and "Using chained X.509 certificates (an end entity certificate signed by intermediate CA)."
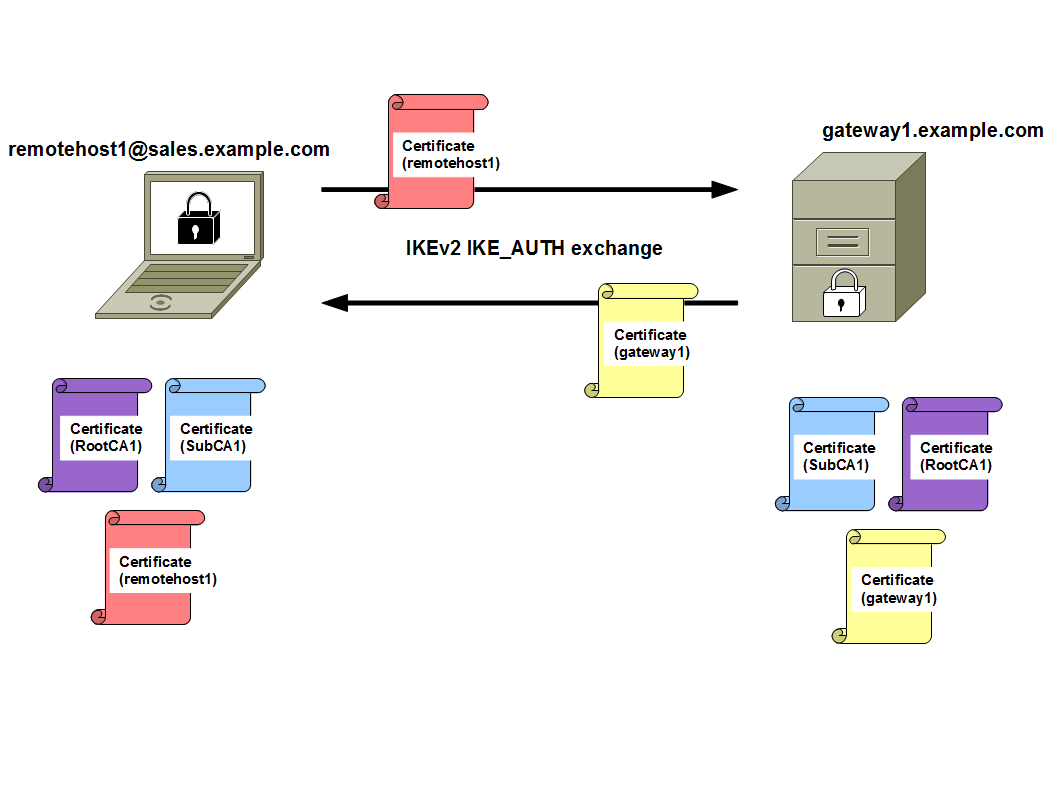
The following examples use the same names for CAs, VPN peers and certificate files.
This page shows two cases to configure Hash and URL encoding for chained X.509 certificates.

Advance preparation:
-
Configure a Web server to distribute VPN peer's certificates.
In the above example, it is cert.example.com.
-
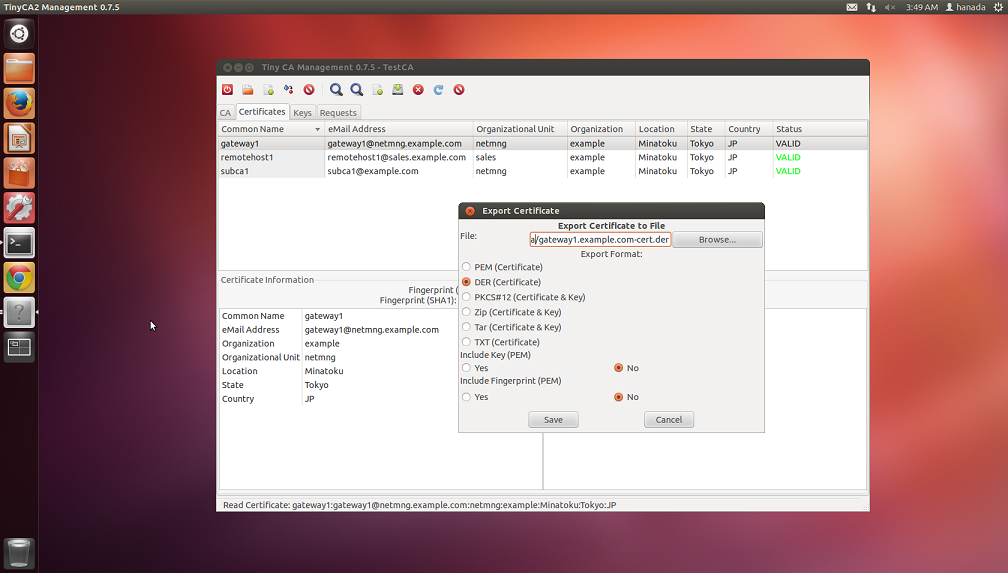
Create(export) DER-encoded certificate files for VPN nodes.
- SubCA1: subca1-cert.der (X.509, DER)
- gateway1.example.com: gateway1.example.com-cert.der (X.509, DER)
- remotehost1@sales.example.com: remotehost1.sales.example.com-cert.der (X.509, DER)
The following image shows the example operation by TinyCA. Click an image to zoom in.

To manage certificates by Tiny CA, please read "Documents/Tips: Managing certificates by Tiny CA."
- Upload the exported certificate files to cert.example.com (Web server).
Case (1): VPN peers exchange end entity certificates and an intermediate CA's certificate.

Configure VPN nodes by Rockhopper Web console.
VPN Gateway (gateway1.example.com):
-
Open Rockhopper Web Console and login.
-
Load a VPN realm's configuration.
- VPN Configuration[Tab] > VPN Realms[Left-Tree]
-
Setup My Key Store.
- VPN Configuration[Tab] > VPN Realms[Left-Tree] > Realm ID: Realm Name[Left-Tree]
> My Key Store[Left-Tree]:
Click this tree node and show My Key Store pane.- Enter the following.
Authentication Method: RSA Signature(RSA-Sig)
My ID Type: auto
Key Format: PEM(Base64-encoding) - File
My Certificate(X.509, *.pem): gateway1.example.com-cert.pem
RSA private key(*.pem): gateway1.example.com-pkey.pem
RSA Private Key's Password: password
-
Setup Certificate URL.
- VPN Configuration[Tab] > VPN Realms[Left-Tree] > Realm ID: Realm Name[Left-Tree]
> My Key Store[Left-Tree] > > Certificate URL[Left-Tree]:
Click this tree node and show Certificate URL pane.- Click Add Certificate URL button.
- Add a New Certificate URL[Dialog]: Enter the followings, then click OK button.
Type: My Certificate
URL: cert.example.com/gateway1.example.com-cert.der
In this example, the DER-encoded certificate for gateway1.example.com is available at http://cert.example.com/gateway1.example.com-cert.der.
-
Setup CA Certificate/CRL.
- VPN Configuration[Tab] > VPN Realms[Left-Tree] > Realm ID: Realm Name[Left-Tree]
> CA Certificate/CRL[Left-Tree]:
Click this tree node and show CA Certificate/Certificate Revocation List(CRL) pane.- Enter the following.
Certificate/CRL Format: PEM(Base64-encoding) - File
CA Certificates(X.509, *.pem): rootca1-cert.pem
-
Save this realm's configuration.
- VPN Configuration[Tab] > Edit VPN Realm(Save, Add, etc.)[Left-Tree]:
Click this tree node and show Edit VPN Realm(Save, Add, Remove, or Load) pane.- Click Save Configuration button.
Remote host (remotehost1@sales.example.com):
-
Open Rockhopper Web Console and login.
-
Load a VPN realm's configuration.
- VPN Configuration[Tab] > VPN Realms[Left-Tree]
-
Setup My Key Store.
- VPN Configuration[Tab] > VPN Realms[Left-Tree] > Realm ID: Realm Name[Left-Tree]
> My Key Store[Left-Tree]:
Click this tree node and show My Key Store pane.- Enter the following.
Authentication Method: RSA Signature(RSA-Sig)
My ID Type: auto
Key Format: PEM(Base64-encoding) - File
My Certificate(X.509, *.pem): chained-remotehost1-my-certs.pem
RSA private key(*.pem): remotehost1.sales.example.com-pkey.pem
RSA Private Key's Password: password
-
Setup Certificate URL.
- VPN Configuration[Tab] > VPN Realms[Left-Tree] > Realm ID: Realm Name[Left-Tree]
> My Key Store[Left-Tree] > > Certificate URL[Left-Tree]:
Click this tree node and show Certificate URL pane.- Click Add Certificate URL button.
- Add a New Certificate URL[Dialog]: Enter the followings, then click OK button.
Type: My Certificate
URL: cert.example.com/gateway1.example.com-cert.der
In this example, the DER-encoded certificate for remotehost1@sales.example.com is available at http://cert.example.com/remotehost1.sales.example.com-cert.der.
Similarly, add a URL for SubCA1's certificate.
Type: intermediate CA Certificate
URL: cert.example.com/subca1-cert.der
SubjectName(DN): C=JP, ST=Tokyo, L=Minatoku, O=example, OU=sales, CN=subca1
In this example, the DER-encoded certificate for SubCA1 is available at http://cert.example.com/subca1-cert.der.
-
Setup CA Certificate/CRL.
- VPN Configuration[Tab] > VPN Realms[Left-Tree] > Realm ID: Realm Name[Left-Tree]
> CA Certificate/CRL[Left-Tree]:
Click this tree node and show CA Certificate/Certificate Revocation List(CRL) pane.- Enter the following.
Certificate/CRL Format: PEM(Base64-encoding) - File
CA Certificates(X.509, *.pem): rootca1-cert.pem
-
Save this realm's configuration.
- VPN Configuration[Tab] > Edit VPN Realm(Save, Add, etc.)[Left-Tree]:
Click this tree node and show Edit VPN Realm(Save, Add, Remove, or Load) pane.- Click Save Configuration button.
Case (2): VPN peers exchange only end entity certificates.

Configure VPN nodes by Rockhopper Web console.
VPN Gateway (gateway1.example.com):
-
Open Rockhopper Web Console and login.
-
Load a VPN realm's configuration.
- VPN Configuration[Tab] > VPN Realms[Left-Tree]
-
Setup My Key Store.
- VPN Configuration[Tab] > VPN Realms[Left-Tree] > Realm ID: Realm Name[Left-Tree]
> My Key Store[Left-Tree]:
Click this tree node and show My Key Store pane.- Enter the following.
Authentication Method: RSA Signature(RSA-Sig)
My ID Type: auto
Key Format: PEM(Base64-encoding) - File
My Certificate(X.509, *.pem): gateway1.example.com-cert.pem
RSA private key(*.pem): gateway1.example.com-pkey.pem
RSA Private Key's Password: password
-
Setup Certificate URL.
- VPN Configuration[Tab] > VPN Realms[Left-Tree] > Realm ID: Realm Name[Left-Tree]
> My Key Store[Left-Tree] > > Certificate URL[Left-Tree]:
Click this tree node and show Certificate URL pane.- Click Add Certificate URL button.
- Add a New Certificate URL[Dialog]: Enter the followings, then click OK button.
Type: My Certificate
URL: cert.example.com/gateway1.example.com-cert.der
In this example, the DER-encoded certificate for gateway1.example.com is available at http://cert.example.com/gateway1.example.com-cert.der.
-
Setup CA Certificate/CRL.
- VPN Configuration[Tab] > VPN Realms[Left-Tree] > Realm ID: Realm Name[Left-Tree]
> CA Certificate/CRL[Left-Tree]:
Click this tree node and show CA Certificate/Certificate Revocation List(CRL) pane.- Enter the following.
Certificate/CRL Format: PEM(Base64-encoding) - File
CA Certificates(X.509, *.pem): chained-ca-certs.pem
-
Save this realm's configuration.
- VPN Configuration[Tab] > Edit VPN Realm(Save, Add, etc.)[Left-Tree]:
Click this tree node and show Edit VPN Realm(Save, Add, Remove, or Load) pane.- Click Save Configuration button.
Remote host (remotehost1@sales.example.com):
-
Open Rockhopper Web Console and login.
-
Load a VPN realm's configuration.
- VPN Configuration[Tab] > VPN Realms[Left-Tree]
-
Setup My Key Store.
- VPN Configuration[Tab] > VPN Realms[Left-Tree] > Realm ID: Realm Name[Left-Tree]
> My Key Store[Left-Tree]:
Click this tree node and show My Key Store pane.- Enter the following.
Authentication Method: RSA Signature(RSA-Sig)
My ID Type: auto
Key Format: PEM(Base64-encoding) - File
My Certificate(X.509, *.pem): remotehost1.sales.example.com-cert.pem
RSA private key(*.pem): remotehost1.sales.example.com-pkey.pem
RSA Private Key's Password: password
-
Setup Certificate URL.
- VPN Configuration[Tab] > VPN Realms[Left-Tree] > Realm ID: Realm Name[Left-Tree]
> My Key Store[Left-Tree] > > Certificate URL[Left-Tree]:
Click this tree node and show Certificate URL pane.- Click Add Certificate URL button.
- Add a New Certificate URL[Dialog]: Enter the followings, then click OK button.
Type: My Certificate
URL: cert.example.com/gateway1.example.com-cert.der
In this example, the DER-encoded certificate for remotehost1@sales.example.com is available at http://cert.example.com/remotehost1.sales.example.com-cert.der.
-
Setup CA Certificate/CRL.
- VPN Configuration[Tab] > VPN Realms[Left-Tree] > Realm ID: Realm Name[Left-Tree]
> CA Certificate/CRL[Left-Tree]:
Click this tree node and show CA Certificate/Certificate Revocation List(CRL) pane.- Enter the following.
Certificate/CRL Format: PEM(Base64-encoding) - File
CA Certificates(X.509, *.pem): chained-ca-certs.pem
-
Save this realm's configuration.
- VPN Configuration[Tab] > Edit VPN Realm(Save, Add, etc.)[Left-Tree]:
Click this tree node and show Edit VPN Realm(Save, Add, Remove, or Load) pane.- Click Save Configuration button.