Rockhopper VPN
IPsec/IKEv2-based VPN software for Linux
Hash and URL for a X.509 certificate.
To avoid packet fragmentation and possible attacks in the IKE_AUTH exchange, you can configure Hash and URL encoding for X.509 certificates. When Hash and URL encoding is configured, VPN peers don't exchange their certificates but get them from a Web server (HTTP).

Enable or disable Hash and URL encoding.
By default, Hash and URL encoding is enabled for an initiator and is disabled for a responder. You can change it on Global Configuration tab of Web console.
- Global Configuration[Tab] > Certificate URL[Tab]
-
Check or uncheck Enable for an initiator or
Enable for a responder.
-
Save the global configuration.
Advance preparation:
-
Configure a Web server to distribute VPN peer's certificates.
In the above example, it is cert.example.com.
-
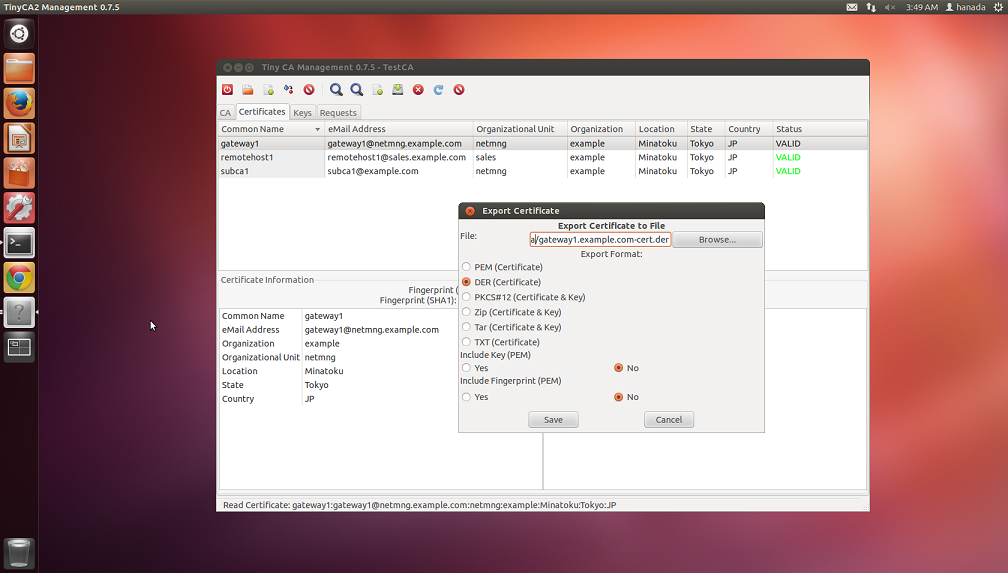
Create(export) DER-encoded certificate files for VPN nodes.
- gateway1.example.com-cert.der (X.509, DER)
- remotehost1.sales.example.com-cert.der (X.509, DER)
The following image shows the example operation by TinyCA. Click an image to zoom in.
To manage certificates by Tiny CA, please read "Documents/Tips: Managing certificates by Tiny CA."
- Upload the exported certificate files to cert.example.com (Web server).
Configure VPN peers to transmit Hash and URL.
VPN Gateway (gateway1.example.com):
-
Open Rockhopper Web Console and login.
-
Load a VPN realm's configuration.
- VPN Configuration[Tab] > VPN Realms[Left-Tree]
-
Setup My Key Store.
- VPN Configuration[Tab] > VPN Realms[Left-Tree] > Realm ID: Realm Name[Left-Tree]
> My Key Store[Left-Tree]:
Click this tree node and show My Key Store pane.- Enter the following.
Authentication Method: RSA Signature(RSA-Sig)
My ID Type: auto
Key Format: PKCS#12 - File
PKCS#12 file(*.p12): gateway1.example.com.p12
RSA Private Key's Password: password -
Setup Certificate URL.
- VPN Configuration[Tab] > VPN Realms[Left-Tree] > Realm ID: Realm Name[Left-Tree]
> My Key Store[Left-Tree] > > Certificate URL[Left-Tree]:
Click this tree node and show Certificate URL pane.- Click Add Certificate URL button.
- Add a New Certificate URL[Dialog]: Enter the followings, then click OK button.
Type: My Certificate
URL: cert.example.com/gateway1.example.com-cert.der
In this example, the DER-encoded certificate for gateway1.example.com is available at http://cert.example.com/gateway1.example.com-cert.der.
-
Save this realm's configuration.
- VPN Configuration[Tab] > Edit VPN Realm(Save, Add, etc.)[Left-Tree]:
Click this tree node and show Edit VPN Realm(Save, Add, Remove, or Load) pane.- Click Save Configuration button.
Remote host (remotehost1@sales.example.com):
-
Open Rockhopper Web Console and login.
-
Load a VPN realm's configuration.
- VPN Configuration[Tab] > VPN Realms[Left-Tree]
-
Setup My Key Store.
- VPN Configuration[Tab] > VPN Realms[Left-Tree] > Realm ID: Realm Name[Left-Tree]
> My Key Store[Left-Tree]:
Click this tree node and show My Key Store pane.- Enter the following.
Authentication Method: RSA Signature(RSA-Sig)
My ID Type: auto
Key Format: PKCS#12 - File
PKCS#12 file(*.p12): remotehost1.sales.example.com.p12
RSA Private Key's Password: password -
Setup Certificate URL.
- VPN Configuration[Tab] > VPN Realms[Left-Tree] > Realm ID: Realm Name[Left-Tree]
> My Key Store[Left-Tree] > > Certificate URL[Left-Tree]:
Click this tree node and show Certificate URL pane.- Click Add Certificate URL button.
- Add a New Certificate URL[Dialog]: Enter the followings, then click OK button.
Type: My Certificate
URL: cert.example.com/remotehost1.sales.example-com.cert.der
In this example, the DER-encoded certificate for remotehost1@sales.example.com is available at http://cert.example.com/remotehost1.sales.example-com.cert.der.
-
Save this realm's configuration.
- VPN Configuration[Tab] > Edit VPN Realm(Save, Add, etc.)[Left-Tree]:
Click this tree node and show Edit VPN Realm(Save, Add, Remove, or Load) pane.- Click Save Configuration button.
Limit Web(HTTP) servers to get certificates.
You can specify Web(HTTP) server's names to get certificates. When a local VPN peer receives certificate URLs (in a CERT payload from a remote peer) including unspecified server names, the authentication process is rejected. If no names are specified, any server's names are accepted (default).
- Global Configuration[Tab] > Certificate URL[Tab]
-
Click Add HTTP Server Name button and
show the Add a HTTP Server Name dialog.
-
Select the Type
(Host name (exact match) or Domain name (suffix-search))
and enter a server name or a domain name in Server Name,
then click OK button.
-
Save the global configuration.