Rockhopper VPN
IPsec/IKEv2-based VPN software for Linux
VPN example: [IPv4 and IPv6] Remote Access VPN, Router(Routing-based VPN), Windows 7/8/10(client), One-armed, Behind a NAT/NAPT and certificate for both Windows 7/8/10 and Rockhoppper (PKCS#12/X.509).
The following image shows example network for this scenario.
Ubuntu is installed on VPN Gateway(Router/Remote Access Server), Internal host/Internal DNS server, Router1(Source NAPT), Router2(Destination NAPT or Port Forwarding) and Router3(A default gateway for protected network).
Rockhopper VPN software is installed on VPN Gateway. A VPN is connected between this node and Windows 7/8/10 VPN Client(IKEv2). VPN Gateway works as a router between VPN (internal subnet, 192.168.100.0/24 and 2001:db8:100::/64) for Windows 7/8/10 VPN Client and protected network (LAN, 192.168.0.0/24 and 2001:db8::/64). The gateway is deployed as a one-armed gateway.
RSA-Signature(certificate) is used for both Windows 7/8/10 VPN Client and VPN Gateway.
Windows 7/8/10 VPN Client and VPN Gateway are located behind a NAT(NAPT). Router1 and Router2 provide NAT/NAPT(Network Address Port Translation) service or Port Forwarding service for them.
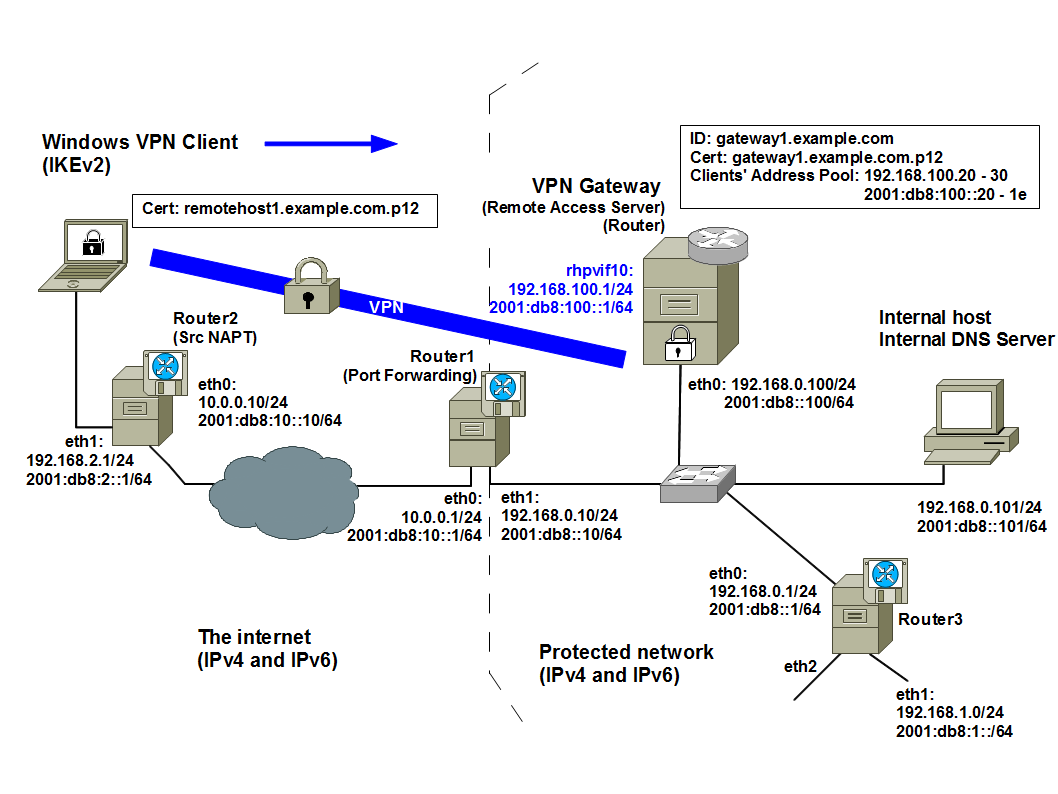
rhpvif10 on VPN Gateway: A virtual interface(a Tunnel/TAP interface) to access internal network. "10" is the VPN realm ID. This interface is automatically created by Rockhopper VPN service and configured not by system tools like ifconfig command but by Rockhopper Web console.
eth0 and/or eth1 on each host: Real interfaces to access physical network.
A VPN realm is a security domain for group members to share the same security policy and VPN configuration. For instance, you can define the VPN realm "10" for a sales team and the other VPN realm "20" for a developing team.
Advance preparation:
- VPN Gateway(gateway1.example.com):
|
# sudo ip addr add 192.168.0.100/24 brd + dev eth0
# sudo ip -6 addr add 2001:db8::100/64 dev eth0 Add default routes to the internet. # sudo ip route add default via 192.168.0.10 # sudo ip -6 route add default via 2001:db8::10 Add routes to the other internal subnets. # sudo ip route add 192.168.1.0/24 via 192.168.0.1 # sudo ip route add 192.168.x.0/24 via 192.168.0.1 # sudo ip -6 route add 2001:db8:1::/64 via 2001:db8::1 # sudo ip -6 route add 2001:db8:x::/64 via 2001:db8::1 Enable IPv4/IPv6 routing. # sudo sysctl net.ipv4.ip_forward=1 # sudo sysctl net.ipv6.conf.all.forwarding=1 |
Install radvd to advertise IPv6 default gateway's info through a VPN connection.
|
# sudo apt-get install radvd
# sudo touch /etc/radvd.conf # sudo vi /etc/radvd.conf |
|
interface rhpvif10
{ AdvSendAdvert on; MaxRtrAdvInterval 60; prefix 2001:0db8:100::/64 { }; }; |
|
# sudo /etc/init.d/radvd restart
or # sudo systemctl restart radvd |
- Router1(Port Forwarding):
|
# sudo ip addr add 10.0.0.1/24 brd + dev eth0
# sudo ip -6 addr add 2001:db8:10::1/64 dev eth0 # sudo ip addr add 192.168.0.10/24 brd + dev eth1 # sudo ip -6 addr add 2001:db8::10/64 dev eth1 # sudo sysctl net.ipv4.ip_forward=1 # sudo sysctl net.ipv6.conf.all.forwarding=1 Forward packets destinated to 10.0.0.1:500(Router1) to 192.168.0.100:500(VPN Gateway). # sudo iptables -t nat -A PREROUTING -p udp --dst 10.0.0.1 --dport 500 -j DNAT --to-destination 192.168.0.100:500 Forward packets destinated to 10.0.0.1:4500(Router1) to 192.168.0.100:4500(VPN Gateway). # sudo iptables -t nat -A PREROUTING -p udp --dst 10.0.0.1 --dport 4500 -j DNAT --to-destination 192.168.0.100:4500 Forward packets destinated to [2001:db8:10::1]:500(Router1) to [2001:db8::1]:500(VPN Gateway). # sudo ip6tables -t nat -A PREROUTING -p udp --dst 2001:db8:10::1 --dport 500 -j DNAT --to-destination [2001:db8::100]:500 Forward packets destinated to [2001:db8:10::1]:4500(Router1) to [2001:db8::1]:4500(VPN Gateway). # sudo ip6tables -t nat -A PREROUTING -p udp --dst 2001:db8:10::1 --dport 4500 -j DNAT --to-destination [2001:db8::100]:4500 |
- Router2(Source NAPT):
|
# sudo ip addr add 10.0.0.10/24 brd + dev eth0
# sudo ip -6 addr add 2001:db8:10::10/64 dev eth0 # sudo ip addr add 192.168.2.1/24 brd + dev eth1 # sudo ip -6 addr add 2001:db8:2::1/64 dev eth1 # sudo sysctl net.ipv4.ip_forward=1 # sudo sysctl net.ipv6.conf.all.forwarding=1 Exec NAPT for packets from private network(192.168.2.0/24). # sudo iptables -t -nat -A POSTROUTING -o eth0 -j MASQUERADE --random -s 192.168.2.0/24 Exec NAPT for packets from private network(2001:db8:2::/64). # sudo ip6tables -t -nat -A POSTROUTING -o eth0 -j MASQUERADE --random -s 2001:db8:2::/64 |
If you need DHCPv4 and IPv6 Router Advertisement services, install Dnsmasq and radvd for example.
|
# sudo apt-get install radvd
# sudo touch /etc/radvd.conf # sudo vi /etc/radvd.conf |
|
interface eth1
{ AdvSendAdvert on; MaxRtrAdvInterval 60; prefix 2001:0db8:2::/64 { }; }; |
|
# sudo /etc/init.d/radvd restart
or # sudo systemctl restart radvd |
- Router3(A default gateway for protected network.):
|
# sudo ip addr add 192.168.0.1/24 brd + dev eth0
# sudo ip -6 addr add 2001:db8::1/64 dev eth0 # sudo ip addr add 192.168.1.1/24 brd + dev eth1 # sudo ip -6 addr add 2001:db8:1::1/64 dev eth1 # sudo sysctl net.ipv4.ip_forward=1 # sudo sysctl net.ipv6.conf.all.forwarding=1 |
- Internal host/Internal DNS server:
|
# sudo ip addr add 192.168.0.101/24 brd + dev eth0
# sudo ip -6 addr add 2001:db8::101/64 dev eth0 Add a route to the VPN's subnets(192.168.100.0/24 and 2001:db8:100::/64) for DNS queries from Windows 7/8/10 VPN Client. # sudo ip route add 192.168.100.0/24 via 192.168.0.100 # sudo ip -6 route add 2001:db8:100::/64 via 2001:db8::100 |
Above configuration will be lost after you restart your computer. To setup permanent configuration, you can edit /etc/network/interface and /etc/sysctl.conf. The followings are an example for VPN Gateway(gateway1.example.com) on Ubuntu.
- /etc/network/interface (Ubuntu):
|
auto eth0
iface eth0 inet static address 192.168.0.100 network 192.168.0.0 netmask 255.255.255.0 gateway 192.168.0.10 up ip route add 192.168.1.0/64 via 192.168.0.1 up ip route add 192.168.x.0/64 via 192.168.0.1 iface eth0 inet6 static address 2001:db8::100 netmask 64 gateway 2001:db8::10 up ip -6 route add 2001:db8:1::/64 via 2001:db8::1 up ip -6 route add 2001:db8:x::/64 via 2001:db8::1 |
- /etc/sysctl.conf (Ubuntu):
|
# Uncomment the next line to enable packet forwarding for IPv4
net.ipv4.ip_forward=1 # Uncomment the next line to enable packet forwarding for IPv6 net.ipv6.conf.all.forwarding=1 |
- PKCS#12 files:
- VPN Gateway(Router): gateway1.example.com.p12 (PKCS#12)
- Windows 7/8/10 VPN Client: remotehost1.example.com.p12 (PKCS#12)
The certificate(X.509) for each node includes a subjectAltName(Host name/FQDN).
- VPN Gateway: gateway1.example.com (Host name/FQDN)
- Windows 7/8/10 VPN Client: remotehost1.example.com (Host name/FQDN)
See "Tips: Creating a Rockhopper's certificate compatible with a Windows 7/8/10 VPN client by XCA." and "Documents/Tips: Managing certificates by XCA" to create the each PKCS#12 file, including a private key, a certificate(X.509) for VPN Gateway or Windows 7/8/10 VPN Client and a CA certificate(X.509).
Configuring VPN:
VPN Gateway(gateway1.example.com):
-
Open Rockhopper Web console on http://127.0.0.1:32501 (by default)
by Firefox.
-
Login with administrator's name and password. (by default, admin
and secret).
-
If VPN Configuration
tab is not shown, uncheck Hide configuration tabs checkbox.
-
Add a new VPN realm.
- VPN Configuration[Tab] > Edit VPN Realm(Save, Add, etc.)[Left-Tree]:
Click this tree node and show Edit VPN Realm(Save, Add, Remove, or Load) pane.- Click Add VPN Realm button.
- Add a VPN Realm[Dialog]: Enter the following, then click OK button.
Realm ID: 10
Realm Name: Example VPN
Description: Config for Example VPN.
Mode: Router
-
Setup VPN Interface.
- VPN Configuration[Tab] > VPN Realms[Left-Tree] > 10:Example VPN(Bridge)[Left-Tree] > VPN Interface[Left-Tree]:
Click this tree node and show VPN Tunnel/TAP Interface pane.- Enter or select the following.
Internal Address Type: Static Address
Internal Address > IPv4: 192.168.100.1 Netmask: 255.255.255.0
Internal Address > IPv6: 2001:db8:100::1 Prefix: 64
-
Setup Network Interface.
- VPN Configuration[Tab] > VPN Realms[Left-Tree] > 10:Example VPN(Bridge)[Left-Tree] > Network Interface[Left-Tree]:
Click this tree node and show Network Interface pane.- Select eth0 to establish VPN.
-
Setup Service.
- VPN Configuration[Tab] > VPN Realms[Left-Tree] > 10:Example VPN(Bridge)[Left-Tree] > Service[Left-Tree]:
Click this tree node and show Service pane.- Network Deployment: Select Hub(Concentrator) Node.
- Remote Configuration(IKEv2): Select Remote Configuration Server.
-
Setup Remote Config Server.
- VPN Configuration[Tab] > VPN Realms[Left-Tree] > 10:Example VPN(Bridge)[Left-Tree] >Service[Left-Tree] > Remote Config Server[Left-Tree]:
Click this tree node and show Remote Config Server(IKEv2) pane.
-
Setup Remote Config Server - Internal Address Pool.
- Remote Config Server(IKEv2)[Pane] > Internal Address Pool[Tab]:
Click Add Address Pool button.
- Add a New Address Pool[Dialog]: Enter the following, then click OK button.
Address Type: IPv4 Address Range
IPv4 Address Range: 192.168.100.20 - 192.168.100.30
Similarly, add the following for IPv6.
Address Type: IPv6 Address Range
IPv6 Address Range: 2001:db8:100::20 - 2001:db8:100::2a
-
Setup Remote Config Server - Internal Route Map.
- Remote Config Server(IKEv2)[Pane] > Internal Route Map[Tab]:
Check Allow link-local ICMPv6 for Router Solicitation(RS) and Advertisement(RA).
By checking the above setting, traffic selectors allowing link-local ICMPv6(RA/RS) are automatically added for the Windows VPN client. By receiving RA through a VPN tunnel, the VPN client configures it as a default route.
See also Connecting a Windows 7/8/10 VPN Client with Rockhopper. -
Setup Remote Config Server - Internal DNS.
- Remote Config Server(IKEv2)[Pane] > Internal DNS[Tab]:
Enter the following as an Internal DNS server's addresses.
DNS Server's Address > IPv4: 192.168.0.101
DNS Server's Address > IPv6: 2001:db8::101
-
Setup My Key Store.
- VPN Configuration[Tab] > VPN Realms[Left-Tree] > 10:Example VPN(Bridge)[Left-Tree] > My Key Store[Left-Tree]:
Click this tree node and show My Key Store pane.- Enter the following.
Authentication Method: RSA Signature(RSA-Sig)
My ID Type: auto
Imported Key Format: PKCS#12 - File
PKCS#12 file(*.p12): gateway1.example.com.p12
RSA Private Key's Password: himitsu
-
Setup Child SA Settings.
- VPN Configuration[Tab] > VPN Realms[Left-Tree] > 10:Example VPN(Bridge)[Left-Tree] > Child SA Settings[Left-Tree]:
Click this tree node and show Child SA Detailed Settings pane.
Check Enable ESP's UDP-encapsulation for IPv6 NAT-T after receiving a UDP-encapsulated packet from a remote peer(non-Rockhopper).
See also Connecting a Windows 7/8/10 VPN Client with Rockhopper. -
Finally, save this realm's configuration.
- VPN Configuration[Tab] > Edit VPN Realm(Save, Add, etc.)[Left-Tree]: Click this tree node and show "Edit VPN Realm(Save, Add, Remove, or Load)" pane.
- Click Save Configuration button.
Windows 7 VPN Client:
- Import a certificate, a private key and a CA certificate for the Computer account by Microsoft Management Console(MMC).
- Open Microsoft Management Console(MMC) by clicking the Start button, enter "mmc" into the search box, and push Enter.
- On the File menu, point to Add/Remove Snap-in, and open the Add or Remove Snap-ins dialog.
- Click the certificates under Available snap-ins and push Add.
- Select the Computer account and push Next.
- Select the Local computer and push Finish.
- Push OK on Add or Remove Snap-ins dialog and close it.
- Click the folder Certificates(Local Computer) / Personal / Certificates folder, click the Action menu, point to All Tasks, and then click Import.
-
Click Next and follow the instructions.
- An imported PKCS#12 file: remotehost1.example.com.p12
- Password for the private key: naisho
- If a CA's certificate (TestCA) is extracted into Certificates(Local Computer) / Personal / Certificates folder, move it to Certificates(Local Computer) / Trusted Root Certification Authorities / Certificates folder by dragging and dropping the certificate's icon.
- Setup a VPN connection.
- Open Network and sharing center from Control Panel and select Set up a new connection or network.
- Click Connect to a workplace and push Next.
- Click Use my Internet connection (VPN).
- Enter gateway1.example.com into Internet Address and Example VPN into Destination name, check Don't connect now; just set it up so I can connect later and push Next.
- Enter "alice" into User Name and "1234567890" into Password. Push Create and close the wizard dialog. Actually, these information will not be used when you choose RSA-sinature(certificate) as an authentication method.
- Open Network and sharing center from Control Panel again and select Change adapter settings.
- Open the properties dialog of Example VPN adapter and show Security tab.
-
Enter the following:
- Type of VPN: IKEv2
- Data encryption: Require encryption (disconnect if server declines)
- Authentication: Use machine certificates
- Push OK.
- Edit the hosts file if DNS service is not available for gateway1.example.com.
- Open "C:Windows/System32/drivers/etc/hosts" by notepad as an administrator. If you can't find these folders, please see Show hidden files.
-
Add the following line into this hosts file.
2001:db8:10::1 gateway1.example.com # (Example VPN)
10.0.0.1 gateway1.example.com # (Example VPN)
-
Save and close the file.
- Connect VPN
- Open Network and sharing center from Control Panel again and select Connect to a network.
- Connect Example VPN.
Windows 8 VPN Client:
Also, see Windows 8 VPN Get Connected by Microsoft.
- Import a certificate, a private key and a CA certificate for the Computer account by Microsoft Management Console(MMC).
- Move the cursor to the right corner of your screen and open Charms.
- Open Microsoft Management Console(MMC) by clicking the Search icon and entering "mmc" into the search box.
- On the File menu, point to Add/Remove Snap-in, and open the Add or Remove Snap-ins dialog.
- Click the certificates under Available snap-ins and push Add.
- Select the Computer account and push Next.
- Select the Local computer and push Finish.
- Push OK on Add or Remove Snap-ins dialog and close it.
- Click the folder Certificates(Local Computer) / Personal / Certificates folder, click the Action menu, point to All Tasks, and then click Import.
-
Click Next and follow the instructions.
- An imported PKCS#12 file: remotehost1.example.com.p12
- Password for the private key: naisho
- If a CA's certificate (TestCA) is extracted into Certificates(Local Computer) / Personal / Certificates folder, move it to Certificates(Local Computer) / Trusted Root Certification Authorities / Certificates folder by dragging and dropping the certificate's icon.
- Setup a VPN connection.
- Move the cursor to the right corner of your screen and open Charms.
- Open Control Panel by clicking the Search icon and entering "Control Panel" into the search box.
- Open Network and sharing center from the Control Panel's Network and Internet and then click Set up a new connection or network.
- Click Connect to a workplace and push Next.
- Click Use my Internet connection (VPN).
- Enter gateway1.example.com into Internet Address and Example VPN into Destination name and push Create.
- Open Network and sharing center from Control Panel again and click Change adapter settings.
- Open the properties dialog of Example VPN adapter and show Security tab.
-
Enter the following:
- Type of VPN: IKEv2
- Data encryption: Require encryption (disconnect if server declines)
- Authentication: "Use machine certificates"
- Push OK.
- Edit the hosts file if DNS service is not available for gateway1.example.com as mentioned above.
- Connect VPN:
- Move the cursor to the right corner of your screen and open Charms.
- Click Settings and then click the Network icon.
- In Networks click the Example VPN connection and then push Connect.
Windows 10 VPN Client:
See Connect a Windows 10 VPN client with Rockhopper - Use machine certificate - PKCS#12/X.509.