Rockhopper VPN
IPsec/IKEv2-based VPN software for Linux
VPN example:
Site-to-Site VPN (Hub and Spoke), Router (Routing-based VPN), Static routing,
Behind a NAT/NAPT and certificate (PKCS#12/X.509).
The following image shows example hub and spoke VPN for this scenario.
Ubuntu is installed on HubGw (Hub), SpokeGw1 (Spoke), SpokeGw2 (Spoke) and Router1.
Rockhopper VPN software is installed on HubGw, SpokeGw1 and SpokeGw2.
VPN is connected between HubGw, SpokeGw1 and SpokeGw2. Each of these three gateways works as a router between Site0, Site1 and Site2. HubGw fowards packets between the spoke sites.
RSA-Signature(certificate) is used as an authentication method for all the VPN gateways.
HubGw is deployed in a one-armed configuration and located behind a NAT(NAPT). Therefore, a default gateway for an internal server in the Site0 is not Router1(192.168.0.1/24) but HubGw(192.168.0.10/24).
Router1 provides Port Forwarding service.
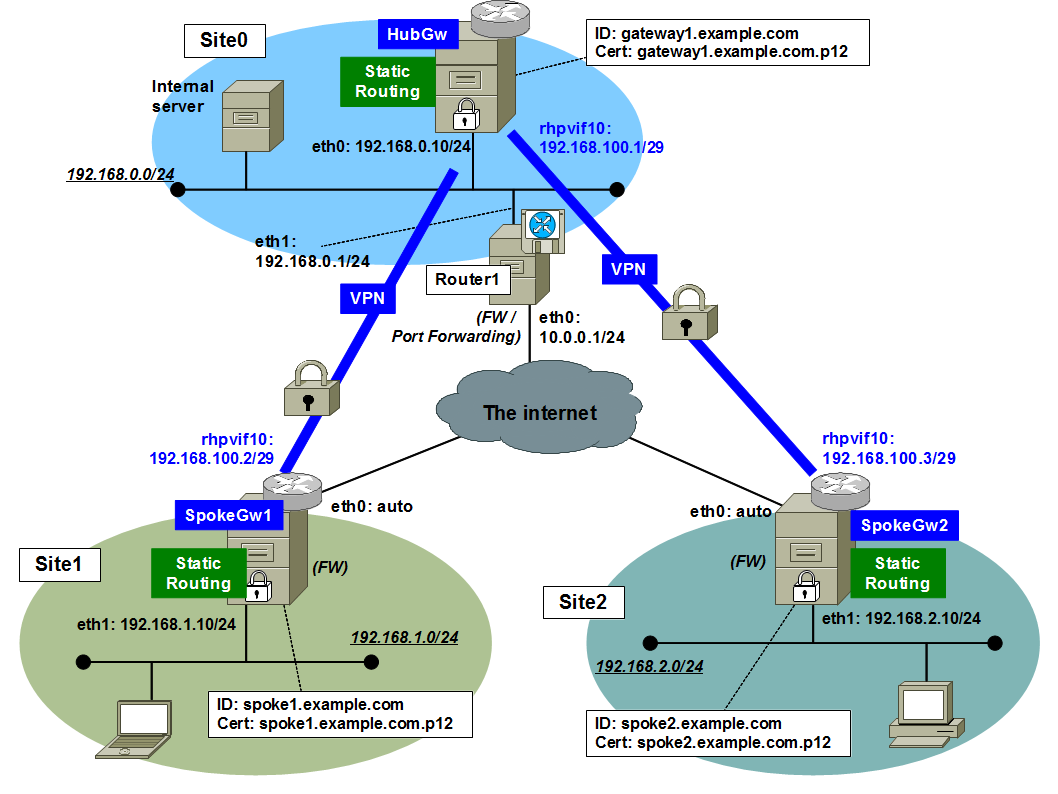
rhpvif10 on each gateway: A virtual interface(a Tunnel/TAP interface) to access protected network. "10" is the VPN realm ID. This interface is automatically created by Rockhopper VPN service and configured not by system tools like ifconfig command but by Rockhopper Web console.
eth0 and eth1 on each gateway: A real interface to access physical network.
Advance preparation:
- HubGw (gateway1.example.com):
|
Setup a physical interface.
# sudo ifconfig eth0 192.168.0.10 netmask 255.255.255.0 # sudo route add default gw 192.168.0.1 # sudo sysctl net.ipv4.ip_forward=1 |
- SpokeGw1 (spoke1.example.com):
|
Setup physical interfaces.
eth0 and a default route are configured according to your ISP's instructions. # sudo ifconfig eth1 192.168.1.10 netmask 255.255.255.0 Enable IPv4 routing. # sudo sysctl net.ipv4.ip_forward=1 |
- SpokeGw2 (spoke2.example.com):
|
Setup physical interfaces.
eth0 and a default route are configured according to your ISP's instructions. # sudo ifconfig eth1 192.168.2.10 netmask 255.255.255.0 Enable IPv4 routing. # sudo sysctl net.ipv4.ip_forward=1 |
- Router1 (Port Forwarding):
|
# sudo ifconfig eth0 10.0.0.1 netmask 255.255.255.0
# sudo ifconfig eth1 192.168.0.1 netmask 255.255.255.0 Enable IPv4 routing. # sudo sysctl net.ipv4.ip_forward=1 Forward packets destinated to 10.0.0.1:500(Router1) to 192.168.0.10:500(HubGw). # sudo iptables -t nat -A PREROUTING -p udp --dst 10.0.0.1 --dport 500 -j DNAT --to-destination 192.168.0.10:500 Forward packets destinated to 10.0.0.1:4500(Router1) to 192.168.0.10:4500(HubGw). # sudo iptables -t nat -A PREROUTING -p udp --dst 10.0.0.1 --dport 4500 -j DNAT --to-destination 192.168.0.10:4500 |
Above configuration will be lost after you restart your computer. To setup permanent configuration, you can edit /etc/network/interfaces like this. This is an example for HubGw (gateway1.example.com) on Ubuntu.
- /etc/network/interfaces (Ubuntu):
|
auto eth0
iface eth0 inet static address 192.168.0.10 network 192.168.0.0 netmask 255.255.255.0 broadcast 192.168.0.255 gateway 192.168.0.1 |
- PKCS#12 files:
- HubGw: gateway1.example.com.p12
- SpokeGw1: spoke1.example.com.p12
- SpokeGw2: spoke2.example.com.p12
The certificate(X.509) for each node includes a subjectAltName(Host name/FQDN).
- HubGw: gateway1.example.com (Host name/FQDN)
- SpokeGw1: spoke1.example.com (Host name/FQDN)
- SpokeGw2: spoke2.example.com (Host name/FQDN)
See "Documents/Tips: Managing certificates by XCA" to create the each PKCS#12 file, including a private key and a certificate(X.509) and a CA certificate(X.509).
Configuring VPN:
HubGw (gateway1.example.com):
- Open Rockhopper Web console on http://127.0.0.1:32501 (by default) by Firefox.
- Login with administrator's name and password (by default, admin and secret).
- If VPN Configuration tab is not shown, uncheck Hide configuration tabs checkbox.
-
Add a new VPN realm.
- VPN Configuration[Tab] > Edit VPN Realm(Save, Add, etc.)[Left-Tree]: Click this tree node and show Edit VPN Realm(Save, Add, Remove, or Load) pane.
- Click Add VPN Realm button.
- Add a VPN Realm[Dialog]: Enter the following, then click OK button.
Realm ID: 10
Realm Name: "Example VPN"
Description: "Config for Example VPN."
Mode: Router -
Setup VPN Interface.
- VPN Configuration[Tab] > VPN Realms[Left-Tree] > 10:Example VPN(Router)[Left-Tree] > VPN Interface[Left-Tree]:
Click this tree node and show VPN Tunnel/TAP Interface pane.- Enter the following. This address is for the virtual interface rhpvif10.
Internal Address Type: Static Address
Internal IPv4 Address: 192.168.100.1
Netmask: 255.255.255.248 -
Setup Network Interface.
- VPN Configuration[Tab] > VPN Realms[Left-Tree] > 10:Example VPN(Router)[Left-Tree] > Network Interface[Left-Tree]: Click this tree node and show Network Interface pane.
- Uncheck Use default route and enter the followings.
Primary interface:
- Name: Select eth0 as a source interface.
-
Setup Service.
- VPN Configuration[Tab] > VPN Realms[Left-Tree] > 10:Example VPN(Router)[Left-Tree] > Service[Left-Tree]:
Click this tree node and show Service pane.- Network Deployment: Select Hub(Concentrator) Node.
-
Setup My Key Store.
- VPN Configuration[Tab] > VPN Realms[Left-Tree] > 10:Example VPN(Router)[Left-Tree] > My Key Store[Left-Tree]:
Click this tree node and show My Key Store pane.- Enter the following.
Authentication Method: RSA Signature(RSA-Sig)
My ID Type: auto
Imported Key Format: PKCS#12 - File
PKCS#12 file(*.p12): gateway1.example.com.p12
RSA Private Key's Password: himitsu -
Setup Internal Route Map (internal routing information).
- VPN Configuration[Tab] > VPN Realms[Left-Tree] > 10:Example VPN(Router)[Left-Tree]
> Internal Route Map[Left-Tree]:
Click this tree node and show Internal Route Map pane.- Click Add Route button.
Add a New Internal Route[Dialog]:
Enter the following routing entry to the Site1, then click OK button.Destination IPv4 Network(*): 192.168.1.0
Netmask(*): 255.255.255.0
Forwarding Type(*): Gateway IPv4 Address
Forward to(*): 192.168.100.2
Similarly, add the following routing entry to the Site2.
Destination IPv4 Network(*): 192.168.2.0
Netmask(*): 255.255.255.0
Forwarding Type(*): Gateway IPv4 Address
Forward to(*): 192.168.100.3 -
Save this realm's configuration.
- VPN Configuration[Tab] > Edit VPN Realm(Save, Add, etc.)[Left-Tree]:
Click this tree node and show Edit VPN Realm(Save, Add, Remove, or Load) pane.- Click Save Configuration button.
SpokeGw1 (spoke1.example.com):
- Open Rockhopper Web console on http://127.0.0.1:32501 (by default) by Firefox.
- Login with administrator's name and password (by default, admin and secret).
- If VPN Configuration tab is not shown, uncheck Hide configuration tabs checkbox.
-
Add a new VPN realm.
- VPN Configuration[Tab] > Edit VPN Realm(Save, Add, etc.)[Left-Tree]: Click this tree node and show Edit VPN Realm(Save, Add, Remove, or Load) pane.
- Click Add VPN Realm button.
- Add a VPN Realm[Dialog]: Enter the following, then click OK button.
Realm ID: 10
Realm Name: "Example VPN"
Description: "Config for Example VPN."
Mode: Router -
Setup VPN Interface.
- VPN Configuration[Tab] > VPN Realms[Left-Tree] > 10:Example VPN(Router)[Left-Tree] > VPN Interface[Left-Tree]:
Click this tree node and show VPN Tunnel/TAP Interface pane.- Enter the following. This address is for the virtual interface rhpvif10.
Internal Address Type: Static Address
Internal IPv4 Address: 192.168.100.2
Netmask: 255.255.255.248 -
Setup Network Interface.
- VPN Configuration[Tab] > VPN Realms[Left-Tree] > 10:Example VPN(Router)[Left-Tree] > Network Interface[Left-Tree]: Click this tree node and show Network Interface pane.
- Uncheck Use default route and enter the followings.
Primary interface:
- Name: Select eth0 as a source interface.
-
Setup Service.
- VPN Configuration[Tab] > VPN Realms[Left-Tree] > 10:Example VPN(Router)[Left-Tree] > Service[Left-Tree]:
Click this tree node and show Service pane.- Network Deployment: Select Spoke Node / Client / Other.
-
Setup My Key Store.
- VPN Configuration[Tab] > VPN Realms[Left-Tree] > 10:Example VPN(Router)[Left-Tree] > My Key Store[Left-Tree]:
Click this tree node and show My Key Store pane.- Enter the following.
Authentication Method: RSA Signature(RSA-Sig)
My ID Type: auto
Imported Key Format: PKCS#12 - File
PKCS#12 file(*.p12): spoke1.example.com.p12
RSA Private Key's Password: himitsu -
Setup Peers.
- VPN Configuration[Tab] > VPN Realms[Left-Tree] > 10:Example VPN(Router)[Left-Tree] > Peers[Left-Tree]: Click this tree node and show Peers pane.
- Click Add Peer button.
Add a New Peer[Dialog]: Enter the following, then click OK button.Peer ID Type: IKEv2: Host Name(FQDN)
Peer ID: gateway1.example.com -
Setup the Peer's information.
- VPN Configuration[Tab] > VPN Realms[Left-Tree] > 10:Example VPN(Router)[Left-Tree] > Peers[Left-Tree] > gateway1.example.com(FQDN)[Left-Tree]:
Click this tree node and show Peer: gateway1.example.com(FQDN) pane.- Enter the following.
Peer's IPv4 Address: 10.0.0.1 (Router1's global address)
This peer's Network Deployment: Hub(Concentrator) Node
Always-on connection: Check Enabled. -
Setup Internal Route Map (internal routing information).
- VPN Configuration[Tab] > VPN Realms[Left-Tree] > 10:Example VPN(Router)[Left-Tree]
> Internal Route Map[Left-Tree]:
Click this tree node and show Internal Route Map pane.- Click Add Route button.
Add a New Internal Route[Dialog]:
Enter the following routing entry to the Site0, then click OK button.Destination IPv4 Network(*): 192.168.0.0
Netmask(*): 255.255.255.0
Forwarding Type(*): Gateway IPv4 Address
Forward to(*): 192.168.100.1
Similarly, add the following routing entry to the Site2.
Destination IPv4 Network(*): 192.168.2.0
Netmask(*): 255.255.255.0
Forwarding Type(*): Gateway IPv4 Address
Forward to(*): 192.168.100.3 -
Save this realm's configuration.
- VPN Configuration[Tab] > Edit VPN Realm(Save, Add, etc.)[Left-Tree]:
Click this tree node and show Edit VPN Realm(Save, Add, Remove, or Load) pane.- Click Save Configuration button.
SpokeGw2 (spoke2.example.com):
- Open Rockhopper Web console on http://127.0.0.1:32501 (by default) by Firefox.
- Login with administrator's name and password (by default, admin and secret).
- If VPN Configuration tab is not shown, uncheck Hide configuration tabs checkbox.
-
Add a new VPN realm.
- VPN Configuration[Tab] > Edit VPN Realm(Save, Add, etc.)[Left-Tree]: Click this tree node and show Edit VPN Realm(Save, Add, Remove, or Load) pane.
- Click Add VPN Realm button.
- Add a VPN Realm[Dialog]: Enter the following, then click OK button.
Realm ID: 10
Realm Name: "Example VPN"
Description: "Config for Example VPN."
Mode: Router -
Setup VPN Interface.
- VPN Configuration[Tab] > VPN Realms[Left-Tree] > 10:Example VPN(Router)[Left-Tree] > VPN Interface[Left-Tree]:
Click this tree node and show VPN Tunnel/TAP Interface pane.- Enter the following. This address is for the virtual interface rhpvif10.
Internal Address Type: Static Address
Internal IPv4 Address: 192.168.100.3
Netmask: 255.255.255.248 -
Setup Network Interface.
- VPN Configuration[Tab] > VPN Realms[Left-Tree] > 10:Example VPN(Router)[Left-Tree] > Network Interface[Left-Tree]: Click this tree node and show Network Interface pane.
- Uncheck Use default route and enter the followings.
Primary interface:
- Name: Select eth0 as a source interface.
-
Setup Service.
- VPN Configuration[Tab] > VPN Realms[Left-Tree] > 10:Example VPN(Router)[Left-Tree] > Service[Left-Tree]:
Click this tree node and show Service pane.- Network Deployment: Select Spoke Node / Client / Other.
-
Setup My Key Store.
- VPN Configuration[Tab] > VPN Realms[Left-Tree] > 10:Example VPN(Router)[Left-Tree] > My Key Store[Left-Tree]:
Click this tree node and show My Key Store pane.- Enter the following.
Authentication Method: RSA Signature(RSA-Sig)
My ID Type: auto
Imported Key Format: PKCS#12 - File
PKCS#12 file(*.p12): spoke2.example.com.p12
RSA Private Key's Password: himitsu -
Setup Peers.
- VPN Configuration[Tab] > VPN Realms[Left-Tree] > 10:Example VPN(Router)[Left-Tree] > Peers[Left-Tree]: Click this tree node and show Peers pane.
- Click Add Peer button.
Add a New Peer[Dialog]: Enter the following, then click OK button.Peer ID Type: IKEv2: Host Name(FQDN)
Peer ID: gateway1.example.com -
Setup the Peer's information.
- VPN Configuration[Tab] > VPN Realms[Left-Tree] > 10:Example VPN(Router)[Left-Tree] > Peers[Left-Tree] > gateway1.example.com(FQDN)[Left-Tree]:
Click this tree node and show Peer: gateway1.example.com(FQDN) pane.- Enter the following.
Peer's IPv4 Address: 10.0.0.1 (Router1's global address)
This peer's Network Deployment: Hub(Concentrator) Node
Always-on connection: Check Enabled. -
Setup Internal Route Map (internal routing information).
- VPN Configuration[Tab] > VPN Realms[Left-Tree] > 10:Example VPN(Router)[Left-Tree]
> Internal Route Map[Left-Tree]:
Click this tree node and show Internal Route Map pane.- Click Add Route button.
Add a New Internal Route[Dialog]:
Enter the following routing entry to the Site0, then click OK button.Destination IPv4 Network(*): 192.168.0.0
Netmask(*): 255.255.255.0
Forwarding Type(*): Gateway IPv4 Address
Forward to(*): 192.168.100.1
Similarly, add the following routing entry to the Site1.
Destination IPv4 Network(*): 192.168.1.0
Netmask(*): 255.255.255.0
Forwarding Type(*): Gateway IPv4 Address
Forward to(*): 192.168.100.2 -
Save this realm's configuration.
- VPN Configuration[Tab] > Edit VPN Realm(Save, Add, etc.)[Left-Tree]:
Click this tree node and show Edit VPN Realm(Save, Add, Remove, or Load) pane.- Click Save Configuration button.